A realistic tree drawing captures the intricate details of nature, from the textured bark to the delicate veins in each leaf. The trunk should have fine lines and shading to create depth, while the branches extend naturally, varying in thickness. Leaves can be drawn individually or in clusters, with light and shadow enhancing their three-dimensional effect. Roots may peek from the base, grounding the tree in realism. Using graphite, charcoal, or colored pencils allows for tonal variations, making the drawing more lifelike. Attention to detail, such as knots, cracks, and irregularities, ensures an authentic and visually compelling result.
Realistic Tree Drawing: Easy Steps
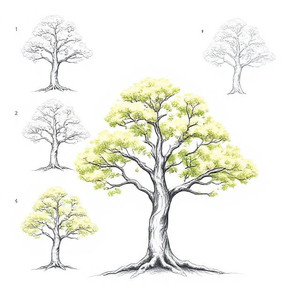
Creating a realistic tree drawing involves understanding the structure, texture, and details of a tree. Below is a step-by-step guide to help you draw a realistic tree:
Step 1: Observe and Plan
- Study a Real Tree or Reference Photo: Look at the shape, branches, and texture of the tree. Notice how the trunk tapers as it rises and how branches grow outward.
- Decide on Composition: Choose the perspective (e.g., close-up, full tree, or a forest scene).
- Lightly Sketch the Basic Shape: Use an HB pencil to outline the tree’s overall shape. Start with the trunk and main branches.
Step 2: Draw the Trunk
- Outline the Trunk: Draw two slightly curved vertical lines to represent the trunk. Make it wider at the base and narrower at the top.
- Add Texture: Use short, irregular lines to create the bark’s texture. Trees have rough, uneven surfaces, so avoid making it too smooth.
- Shade the Trunk: Use a 2B or 4B pencil to add shading. Darken the sides of the trunk to give it a rounded, three-dimensional appearance. Leave the center slightly lighter to show light hitting the surface.
Step 3: Add Main Branches
- Sketch the Primary Branches: Draw thick, uneven lines extending from the trunk. Remember, branches grow upward and outward, not perfectly horizontal.
- Vary Thickness: Make the branches thicker near the trunk and thinner as they extend outward.
- Add Secondary Branches: Draw smaller branches splitting off from the main ones. These should look natural and organic, not symmetrical.
Step 4: Draw the Foliage
- Outline the Canopy: Lightly sketch the general shape of the tree’s foliage. Trees are not perfect circles, so make the outline irregular and organic.
- Add Clusters of Leaves: Instead of drawing individual leaves, create small, overlapping clusters or cloud-like shapes to represent groups of leaves.
- Shade the Foliage: Use a 2B or 4B pencil to add depth. Darken the areas where shadows would naturally fall (e.g., under branches or in the inner canopy). Leave some areas lighter to show highlights.
Step 5: Add Details
- Refine the Bark: Add more texture to the trunk and branches using short, jagged lines. Use a 6B pencil for darker areas.
- Highlight the Leaves: Use a kneaded eraser to lift off some graphite in the foliage, creating highlights where light hits the leaves.
- Add Shadows: Darken the base of the tree and the ground beneath it to anchor the tree and create depth.
Step 6: Blend and Soften
- Blend the Shading: Use a blending tool or tissue to smooth out harsh lines, especially in the foliage and trunk.
- Add Final Details: Use a sharp pencil to add small twigs, cracks in the bark, or individual leaves for realism.
Step 7: Final Touches
- Check Proportions: Ensure the tree looks balanced and natural.
- Enhance Contrast: Darken the shadows and refine the highlights to make the tree pop.
- Sign Your Artwork: Add your signature to complete the drawing.
Tips for Realism:
- Light Source: Decide where the light is coming from and shade accordingly.
- Layering: Build up layers of shading gradually for a more realistic effect.
- Patience: Take your time with details, especially the bark and foliage.
By following these steps and practicing regularly, you’ll be able to create realistic tree drawings that capture the beauty and complexity of nature.
A tree illustration captures the essence of nature by combining organic shapes, textures, and shading to depict the trunk, branches, and foliage in a stylized or realistic manner. It balances detail and simplicity to evoke the tree’s character and environment.


